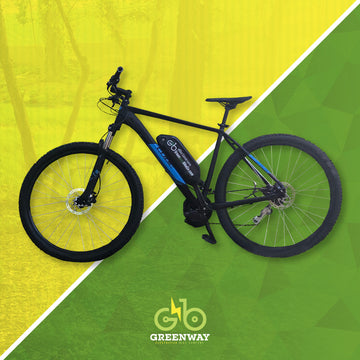
Converting your trusty bicycle into a powerful e-bike is easier than you think! The Tongsheng TSDZ2B mid-drive motor kit offers a fantastic way to add electric assist to your rides, opening up new possibilities for commuting, exploring, and just plain having fun.
If you're a DIY enthusiast with some basic bike maintenance experience, installing a TSDZ2 kit is well within your reach. In this comprehensive guide, we'll walk you through the entire process step-by-step, with clear instructions and helpful images to make it as smooth as possible.
Remember: Always prioritize safety. Before starting, read the instructions thoroughly and ensure you have all the necessary tools.
What’s In the Box
The motor comes out of the box with all of the mounting hardware on the motor so you can easily see where things will go.
 A: Middrive Motor (includes Battery Cable, 6-Pin Sensor Cable, 6- or 8-Pin Display Cable)
Display (Varies)
- VLCD5
- Assist Level Thumb Control
- Thumb Throttle (optional)
- eBrakes (optional)
- XH-18
- VLCD6
- VLCD12
- VLCD13
Battery (sold separately)
Tools Needed

B: Allen Wrenches - 8mm, 6mm, 5mm, 4mm
C: Flathead screwdriver
D: 15mm Pedal Spanner or 15mm Wrench
E: Thread Locker
F: Wire Cutters
G: Torque Wrench
Bench Test
First test your kit and battery are working properly.
- Confirm the battery is turned off.
- Connect the battery cable, display cable, and the throttle cable (if included).
- Turn on the display.
- Turn on Walking/Push Assistance (see specific display manual)
- Use Walk Assist or throttle.
- Confirm that the motor spins correctly.
- Proceed with installation.
Motor Installation
Step 1 - Install Motor
Slide the motor through the bottom bracket housing.

Tip:
If the motor doesn't slide through easily, check inside the bottom bracket housing for:
- Obstructing cable housings (reroute to the side of the bracket if needed)
- A cable guide screw (slightly back this out for clearance)
- Tube welds (if necessary, carefully grind these down for a smooth passage)
Step 2 - Attach the Securing Plate
Install the securing plate with M4 bolts and spacers (hand tighten for now).

Tip:
If the spacers don't fill the gap, don't over tighten or you may bend the plate. Use washers to create a snug fit.


Step 3 - Position the Lockring
- Screw the lockring onto the motor (hand tighten for now).


Step 4 - Position The Fixing Block
- Attach the fixing block onto the motor with the M5 bolt (hand tighten for now).
- Place the fixing plate on the bicycle frame, attaching it to the fixing block with the M4 bolt (hand tighten for now).
- Adjust the motor to a secure position, ensuring cables are not pinched.
- Tighten the fixing block and fixing plate bolts.


Tip:
If the fixing block doesn't work with your frame, you can mount the motor without it. If the motor rotates over time, don't overtighten the lockring. Instead, rotate it snugly against the bottom bracket housing (in the direction of pedaling), hand tighten for now.
Step 5 - Tighten All the Bolts
- Tighten the lockring to 40 Nm (30 ft-lbs) using the Lockring Tool.
- Tighten Securing Plate bolts to 20 Nm (15 ft-lbs)
- Tighten Fixing Block and Fixing Plate bolts to 40 Nm (30 ft-lbs)
Tip:
Never over tighten the bolts as this can damage threads. Apply thread locker and stick to the recommended torque values.
Step 6 - Install Speed Sensor
- Connect the sensor cable to the motor.
- Position the sensor on the left chainstay with two zip ties. Do not fully tighten.
- Screw the magnet onto a spoke. Hand tighten.

Tip:
The sensor has a small arrow indicating magnet alignment. Adjust the sensor and magnet to achieve a consistent speed reading on the display.
Step 7 - Test Speed Sensor
- Temporarily connect the battery to the motor.
- Turn on the display.
- Spin the rear wheel.
- Adjust the magnet and sensor positions until you get a consistent speed reading.
- Tighten the magnet bolts and zip ties.
- Disconnect the battery.

Step 8 - Install Display
Follow the instructions specific to your display.
Step 9 - Cranks and Pedals
- Install crank arms with M5 bolts
- Torque the bolts to 40 Nm (30 ft-lbs).
- Install your existing pedals onto the crank arms.


Enjoy Your New eBike!

Congratulations on transforming your bicycle into a powerful e-bike! Now it's time to hit the road and experience the joy of effortless pedaling. Before your maiden voyage, remember these key points:
- 20-Mile Checkup: After your first few rides, double-check all the bolts and ensure everything remains tight and secure.
- Battery Care: Follow the guidelines for your specific battery to ensure it lasts a long time.
- Ride Responsibly: Be mindful of local e-bike regulations and always share trails with courtesy.
Most importantly, have fun! E-biking is a fantastic way to get exercise, reduce your carbon footprint, and rediscover the simple pleasure of two wheels.
Let me know if you'd like any adjustments to the style or if you want me to emphasize any specific points!